|
|
||||||||||||||
|
Comanches in the 21st Century More Than Just Speed Mods By Hans Neubert
Speed Mods Revisited Over the last 15 years of Twin ownership (1964 PA-30), my focus has been on speed mods and aircraft efficiency. My exploits have been rewarded with a very nice, modern and fast airplane, and have shared those results with the Comanche membership through 15 articles, notes, Tips, and comments, as published in the Comanche Flyer, my two cents worth on the Delphi Comanche Owners forum, and in talk given at the ICS 2002 Convention in Reno.
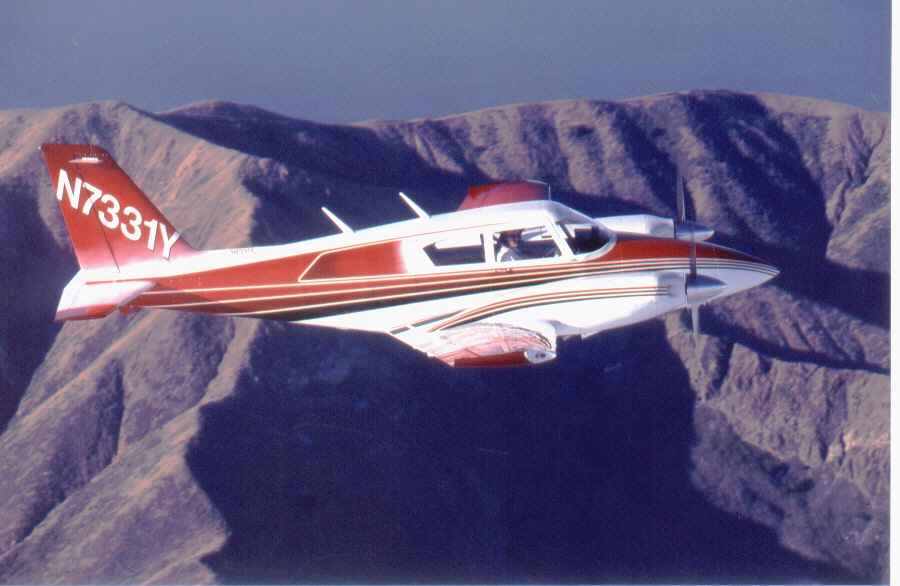
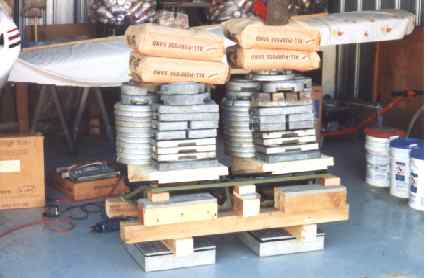
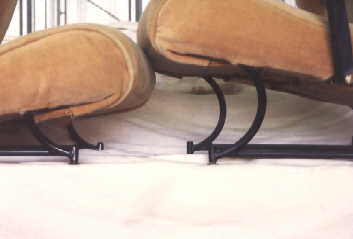
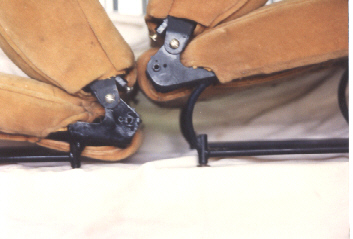
Hans Neubert's fast, beautiful 2002 Flagship over Catalina Island off the Southern California coast There has been much discussion in the Flyer and the Delphi Comanche Owners Forum concerning the effectiveness and value of commercially available speed modifications. Why do some owners report success, and others feel it was a waste of time and money? The answer lies in the details. I, and others, if we have said it once, must have said it a thousand times, rig the airplane for best performance, adjust the landing gear and doors according to the Service Manual, and maintain the seal around the engine-to-cowling as leak free as possible. None of these directives are costly. If the airplane is not operating as Piper designed it, then adding something advertised as a speed modification without having the fundamentals in place will lead to disappointment. Making an airplane go fast requires patience, persistence, and participation. Today only, I'll call them the three P's. The ideal scenario is when the owner is mechanically inclined and has a user friendly mechanic. Otherwise, the installation and labor costs for "tweeking" start mounting up, and eventually the owner will grumble about the cost for so few MPH gained. And rightly so. I have an intense devotion to making my plane as fast and efficient as possible. I also have a good working relationship with my mechanics and IA's. Since I do nearly all the work, the cost is mostly the purchased item only. As a result, I may have an advantage over owners who have their work done by a shop.. My recommendation for those owners interested in getting a little more speed and efficiency out of their airplane, is to install the speed mods of interest all at once and get it over with. Most vendors give a discount for such a purchase, typically 7% to 8% off list price. The suggested list includes: Flap and Aileron Gap Seals Wing Root and Trailing Edge Fairings Gear Lobe Wheel Fairings (must also have the brake caliper reversed) Small Strobe Light Wing Tips with enclosed navigation/strobe lights With the rigging and other initial conditions satisfied first, and the above noted mods, the typical speed gain will be in the order of 9 to 10 mph on singles, and 10 to 11 mph on twins operating at 75% power. The reason for the difference is because these mods address a slightly different percentage of the airplane total drag. After that, one will be in the area of diminishing returns. Sure, blade nav and comm antennas help, the windshield cowler looks nice, and the flap track fairings work, but the benefit-to-cost ratio, especially if the work is done by others, becomes smaller. Generally, if a part is round (rod style antennas, heater exhaust stack, large strobe, etc.) it will be very draggy. Go after those items as the budget permits. When I'm by myself or with someone else in the front seat, I carry four 25 pounds bags of lead shot the baggage compartment. As passengers or baggage are added, the shot bags are selectively removed. This reduces cruise trim drag. So, how fast does it go? While breaking in the overhauled engines, with the airplane and props in perfect condition, a high power run was made over the ocean. Pat Barry, who also has a 64 Twin Comanche but absolutely stock, wanted to verify his engine break-in, too, so we went out together. Running parallel to each other in smooth air, with nearly standard conditions at 2900 feet, 27 inches MP, 2700 rpm, 200 F. rich of peak, Pat's GPS read 170 knots, and mine read 194 knots. The payoff is surely there, but attention to detail is very important in reaching those goals. The Other Mods Most people see my plane as a series of speed mods held together by a flashy paint job. But there are some other modifications that might be of interest to the Comanche crowd, too. Lance Seats The first one was inspired by reading the original Tips Special in which Dale Vandever describes his rear bench seat conversion to Lance seats on his 250. I was able to find seats from a Lance in an Arkansas surplus yard. If you do this mod, select the front two seats, and #5 and #6. The seats from a Lance, Saratoga, or Seneca are all identical, and will work as well. The front seats will slide directly onto the existing tracks. I had to prove to the FSDO that egress, in an emergency, was not altered, which I did by some photos with the old and new seats in the most front and most rearward positions. Dale sent to me his copy of his 337, but the rear seat modification is not well described and a call to the FBO that did his conversion was not terribly helpful. So the rear seat conversion lingered for awhile until I realized an adapter truss would support the new seats and transfer their loads to the Comanche airframe in the same manner as the original bench seat. The truss is fabricated using ¾" square tubing. A load test was witnessed by the Los Angeles ACO and the IA who signed the 337. Two thousand pounds of test weight was borrowed from a test laboratory for the day and loaded in the bed of my Chevrolet S-10 pickup. I had the opportunity to pick up and move the weight 4 times. My back hurt for two weeks. The bottoms of the seats were stripped and a plywood seat bottom was temporarily added. The adapter truss, seats, and a framework of 4x4's was assembled on electronic scales. The photo shows the whole enchilada at 2040 pounds. To make for adequate headroom, the Lance seats need to be cut down, and legs re-welded. After the truss adapter is attached to the airframe, the rear seats now snap in or out at a moments notice, and can be removed from the cabin through the baggage door. The new seats recline, and are very comfortable, with a foldable armrest between them. Also, access to the baggage compartment while in flight is also very handy.
Load test: The truss adapter is painted in green primer, and the seat bottoms are black
Seat legs are cut down and rewelded. Before and after is shown here.
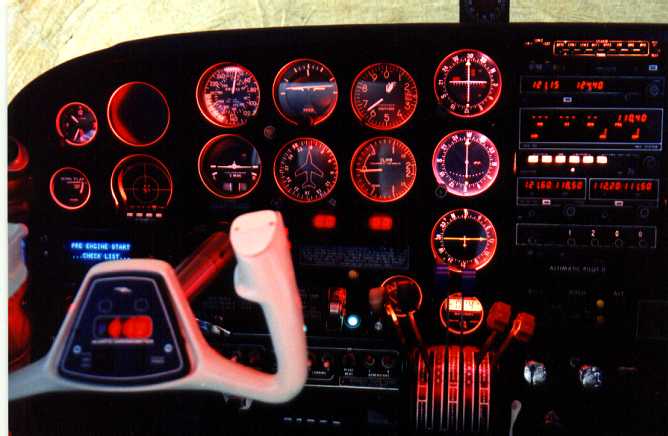
Instrument Lighting Another modification that turned out nice is the instrument panel night lighting. This particular endeavor is also gleaned from the original Tips Special. After revising my instrument panel layout four times, I will stick with this for awhile. When the panel is redone, the original night lighting also changes. The plane originally had the plastic overlay with post lights, which I didn't like. So, a ¼ inch thick acrylic sheet is machined with the instrument and switch cutouts, including a bevel, along with a series of tracks and pockets to hold the peanut bulbs. The machining process works best when the acrylic is submerged (or flooded) with water soluble oil and water. The sheet is then masked at the instrument and bulb holes, and 320 grit sanded everywhere else. A white base coat is applied first, followed by a crinkle black on the front side and flat black on the back. However, my choice for the crinkle black is dated. Nowadays, gray or almond is in vogue. Doing the machining by hand took about 12 hours for the left side, and about 4 hours for the right side. Today, with Cad systems, and CNC machining, the job can be done quite rapidly. As I recall, the left side, shown in the photo, has about 35 bulbs imbedded into the overlay.
Night light system using an acrylic overlay with multiple imbedded bulbs. Control Yoke
In the above picture, you'll probably notice that the control yokes are not original. They are, in fact, made for a brand B airplane, available from Aircraft Spruce. The adapter drawing, connecting the yoke to the control column was published in the September 1991 Flyer, page 20. If you're a member, call ICS HQ and ask for a copy if you choose to make this modification. For those of you that consider it sacrilege to have control wheel from any other brand in a Piper airplane, let's just say it's my plane, and that's all that's important. I have many more interesting mods, but let's leave those for another article. (to be continued)
Hans and Jeannie Neubert Hans has BSME and MSAE degrees, with 35 years of experience in the aerospace industry. He is expert in materials, design and analysis of composite materials in aircraft and spacecraft structures. Hans is also an FAA Designated Engineering Representative (DER) in structures, with approval authority on Part 23 and Part 25 aircraft for major/minor structures and repairs, including non-metallic (composite) structures. |
||||
|
|
||||