|
|
||||||||||||||
|
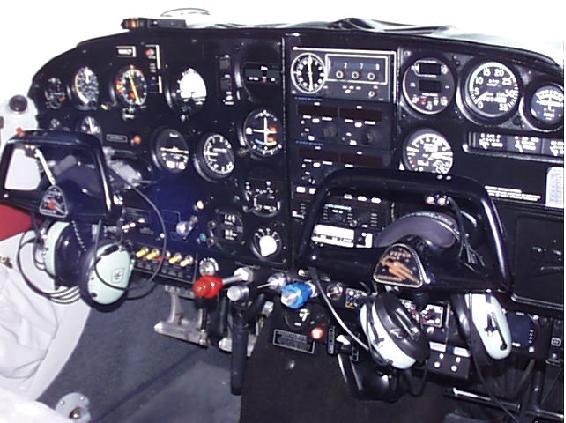
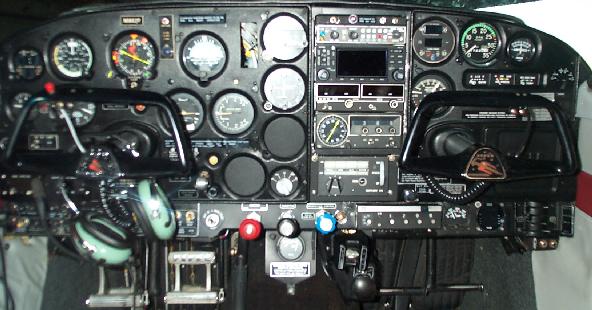
John and Jeff's Excellent Avionics Adventure It all started with a flaky number 2 VOR indicator. About a year ago, I started seeing occasional "odd" behavior on my number 2 VOR. I'd be flying along, tracking a VOR or something, and the needle would start to lazily swing to one side or the other, or sometimes drift toward neutral, then pop back out to whatever deviation it had started at. At first I chalked it up to crummy VOR coverage at low altitudes, but it became clear than something in the number 2 side was not right. Sometimes swapping the number 1 and 2 radios (identical Narco MK12D's) seemed like it helped, sometimes not. After some months of this kind of behavior, I started seeing oddities on the number 1 side as well. At this point I didn't feel like I could reasonably fly the thing under real IFR conditions, so I took it to a local avionics shop, VIP Avionics at HFD. They pulled the radios, bench checked them, found some cold-soldered joints on the number 1, and made some adjustments to number 2. They also gave me some fairly dire warnings about the system in general, essentially that a lot of the equipment was old, and pretty difficult to deal with, because the older Narco units don't easily interface to more modern stuff, and Narco's repair policy make it difficult for shops. But the system was working; things seemed like they were back to normal... ... For a couple of months, then number 2 started flaking out again. After another trip to the radio shop, the verdict was that my number 2 indicator was giving up the ghost. 62P came equipped with a system which, in it's day, was pretty good; a pair of MK12Ds, a DME 195, a CLC60 (simple RNAV) with an NSD360 for the number 1 indicator, and a VOA9 for number 2. The problem was that the VOA9 has a built-in converter, which was apparently common for Narco equipment of that vintage. The MK12Ds have no converters, being designed to drive the older Narco indicators. So I couldn't just swap out the indicator for a modern one, without buying an external converter. Or I could blow out the whole number 2 side with a new radio and indicator. After the obligatory moaning about the state of the budget, I decided to do the latter. About 2 weeks before my appointment to have the work done, my number 1 started flaking out again. This time the symptom was no deviation, no flag, even when off course. After some quick phone calls the consensus was that it was probably the wiring, or possibly the DME. Why the DME? Well, recall that the Narco radios had no converters. The DME195 was acting as the converter for the NSD360 in the number 1 slot. Again, the shops I talked to were pessimistic about how easy or practical it was to fix equipment that was that old, and made by Narco. So I found myself in the position of not being able to trust either NAV radio, and not being able to repair or replace the components which were the likely culprits. One of the avionics people I'd talked to earlier was Jeff Kauffman, of Advanced Avionics in Lempster NH. He'd been trying to talk me into upgrading to a GNS 430. At the time, I was still planning on swapping just the number 2 side, so I passed. Called him back, and we talked about options for a while. After a bunch of back and forth, we settled on a plan where he'd give me a break on the installation price if he could use my airplane as a "reference" installation, and I'd do as much as possible of the work of the install myself, to save some more money. The price ended up still being more than I wanted to spend, but given the alternative of having a Comanche that I couldn't trust to fly IFR, I decided to go for it. In addition to the above-mentioned equipment, I had a Northstar M3/Approach which could also drive number 1. There was also a KR86, inop due to no audio. The upgrade would consist of a GNS430 for number 1, and a KX155 for number 2. The number 2 indicator would be swapped for a KI209. I would be removing both Narco radios, the VOA9, the DME195, the CLC60, the Northstar GPS, and all the plumbing to interconnect all those pieces. The KR86 would get bench checked; if it worked keep it, else toss it. Here's a picture of the 62P's panel before I started:
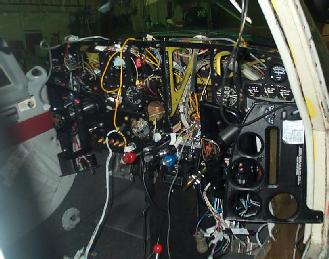
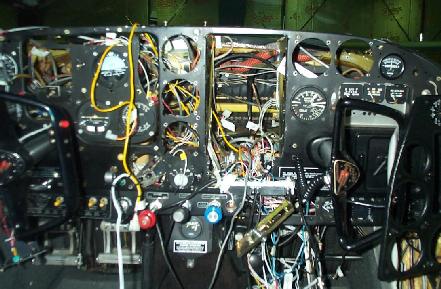
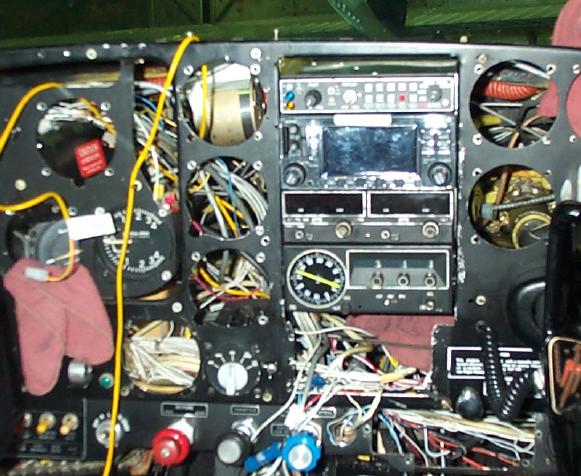
I started by disassembling the panel as much as possible; removing the plastic faceplates. the top, pulling the radios, and dismounting the rails for everything. I left the back plates in place for the moment, because we didn't know exactly what went where, and the goal was to disturb as little as possible that wasn't directly affected by this job. After pulling the panel apart as much as I could, I started tracing wires, labeling things, and, once I'd identified some section as being suitable for removal, getting it out of there. That sounds straightforward enough, but in practice, it took me about 6-7 evenings of work to get reasonably close to having everything identified. By that time I had removed most of the back plates, the plumbing for the KR86 (including some enormous horrible antique connectors, which later were revealed as the cause of the audio problem), and all the stuff leading to the VOA9. The DME195 and CLC60 were mounted in the tail cone, with some impressively large bundles traveling down the right-hand wall of the cabin, under the door sill. Since I was trying to avoid work I didn't need to do, the wiring bundles got left in place, to be removed at the next annual. The panel ends all got cut off (after carefully identifying them!) and the ends taped and pulled up someplace innocuous. The wiring for the NSF was a little more complicated, being connected to the autopilot, NAVE, and the DE, in addition to the switch box that swapped from NAVE to GPs. But eventually I got everything sorted out, and it was time to start reassembling. While I was doing all this, I found some truly weird and wonderful things hidden behind the panel. For instance: The racks for the radios were not installed with nut plates, or anything sane like that, but instead used number 6 machine screws, about an inch longer than they needed to be, with shockproof nuts on the ends. I spent a fair amount of time cursing whoever put all that stuff together, while banging my knuckles on things trying to get those screws out. The autopilot wiring was not part of any bundles, but was sort of loosely draped through various other places back there, essentially bouncing around in the breeze. Parts of it had clearly been chafing on the control cables. A real problem waiting to happen! There used to be a VHF DF installed. This lovely little item was not TSO'ed, and used incredibly crummy wiring, the stuff with the flimsy plastic insulation that you can pull apart with your fingernail. No fuse or circuit breaker; wired straight to the avionics bus. Needless to say, that's now out :-} There was a small potentiometer mounted below the audio panel, I'd never known what it did. Turns out it was wired as a fader between the audio output of the radar altimeter and the audio output of the DF. I don't know who thought that one was a good idea. Jeff claimed that was a new one on him; never seen that kind of thing wired into an airplane before. In general, most of the people who had put wiring in 62P seemed to feel that if a foot of wire was good, three feet was better. I found wires draped, looped, and tied into huge wads. This made tracing things more difficult than it needed to be. A bunch of it got removed; the stuff that we weren't touching at least got tied up into sanitary bundles. It was clear from looking at some of the wiring that various things had been added and modified over the years. In many cases, whoever did the work apparently didn't feel inclined to run new wiring, but just grafted on to the old. This was especially apparent in the power wires to the various radios. I found one power run that contained no fewer than 4 butt-splices between the breaker and the unit that was being powered. Here are some pictures of the panel with pretty much everything removed:
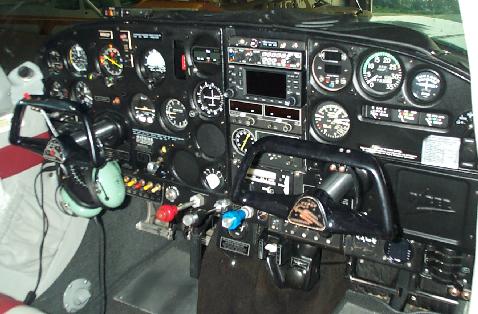
After this process, it was time to start setting up for the new equipment. A good bit of time went into installing the new racks, this time with nut plates! We ended up have to fiddle with the racks more than we originally thought, because the GNS430 is fairly deep, and has a whole lot of wiring coming out the back. By the time you leave room for a service loop, and account for the fact that a thick bundle doesn't like to bend, there's a lot of space taken up. Once the logistics of the 430's wiring harness were settled, the rest of it went together in a relatively straightforward fashion. Still time consuming, because we wanted to make sure it was done right, but not difficult. Since we were pulling everything apart, and were saving space in the stack anyway, I decided to move the audio panel from its former position under the right-side yoke, to the top of the stack. That turned out to be more involved than it should have been, due to having to track down more wiring. The one piece of good news was that there was plenty of extra wire, so once I'd identified what was staying, I didn't have to rewire those pieces. Moving the audio panel allowed me to move the transponder, which had been hung under the right side of the panel, up into the spot where the audio panel had been. I had to make some new brackets to hold the tray in place, and fabricate a new cover for the tray, to keep the wiring bundle that's above it from getting chafed up, but that was straightforward. The antenna wiring was something of a headache. The old GPS antenna had to be removed, and the new Garmin one installed, and a new lead run. The wiring for the antenna goes up the right side pillar between the door and the windshield. In order to get at everything, I had to pull down the light/speaker housing, carefully pull back the headliner, and remove the cover on the pillar. I also had to undo the fasteners for the right-side wall of the cabin, enough to pull it away from the wall. If I were doing it over again, I'd just bite the bullet and pull the floor out, then pull the whole panel off. It was way too much trouble trying to get that panel to do what I wanted while partly detached. Eventually, we got all the new wiring run, and it was time to start installing radios and testing things. The basic hookups, including audio panel and both navs and their respective indicators, as well as the ADF, had been tested on the bench, but there was still plenty to do. Connecting new antenna wiring, rewiring the diodes from the encoder to the 430, getting things connected to the dimmer bus, running the air hoses for the new cooling fan; it all took time. Once we got most stuff in, testing everything consumed some more time. For the most part, the new wiring was correct right off the bat, but there were some glitches. The pilot-side PTT didn't work; turned out to be because it was wired to the wrong pin on the audio panel. The flags on the HSI didn't work when we drove it with a test NAV signal; that was because there was a difference of opinion between the Century documentation and that which came with the 430 about how to hook up some of those signals. After a while, we ran out of things to test on the ground, and it was time to fly! Found a few more oddities there. Most were simple adjustments, often to the software in the 430, but some were more complicated. We couldn't get the marker beacon receiver to work; after a bunch of head-scratching, we finally determined that it was the antenna lead. Some continuity checks revealed a dead short. That wire runs down the right side of the cabin, and I figured I had nicked it with a tool or something. Replacing it involved pulling the whole right side apart, so we ended up pulling out the huge mass of wiring after all. Post mortem analysis of the cable (cutting it open) revealed something I'd never seen; the center conductor was displaced way over to the side of the insulator in a number of places, several of which had come right through to the braid! The only conclusion we could come to was that years of stress had slowly pulled the wire through the plastic, so that it was just waiting for the slightest stress to short out. It turned out that during the rewiring of the transponder and encoder, we had put the diodes in backwards, so that the GPS could read the encoder output, but the transponder couldn't. No mode C. More rewiring. The lighting on the 430 was *WAY* too bright at night, as I discovered on a dead-dark night flying out of MVY. Some hasty manual adjustment fixed it, but it took a bunch of readings of the installation guide to figure out how to get the auto-dim circuit to behave reasonably. But one by one, we got the issues killed off. I don't have too many hours on the new panel yet, but so far it's a joy to fly with. Gone are the worries about my old indicators and/or wiring flaking out. I could have lived with the existing GPS, as there was nothing wrong with the M3, but I'm happy to admit how cool the 430 is. The situational awareness just can't be beat. The net cost of all this was, uhhhh, gulp, something upstream of $10K, which might not sound like much, but for an unbudgeted expense, was painful enough. I hope to recoup some of the expense by selling off the removed equipment, but that will only help a little. The cost would have been substantially higher if I hadn't found an avionics guy who was willing to work with me to keep the price down, including letting me do a bunch of the work myself. If the reader is considering an upgrade like this, I highly recommend doing as much of it hands-on as you and your loved ones can stand. It's a lot of work, but you'll feel end up with a lit Oh, you want to see what it looks like after all the dust has settled?
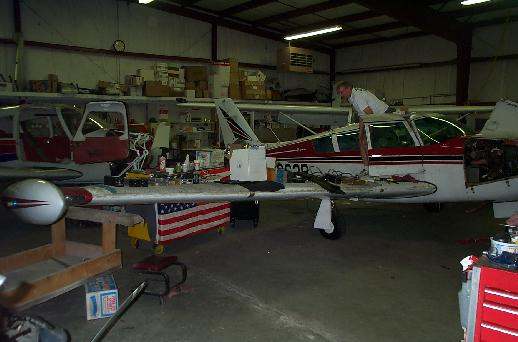
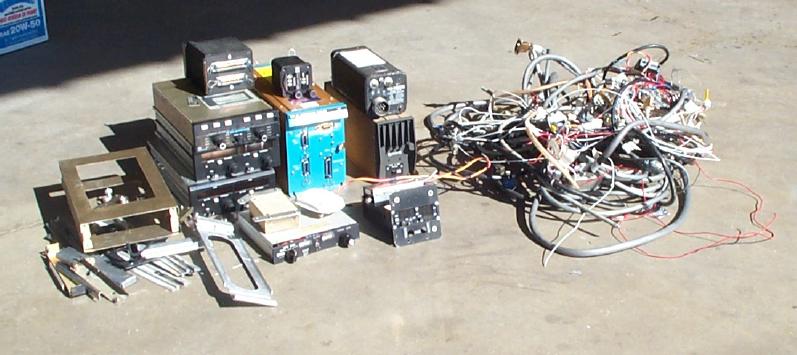
Outside view of '62P, while things are in a high state of disassembly. You can see some of the stuff we removed, piled up on the wing. This is the pile of equipment and wiring which got removed. The wiring along comes to about 15 pounds. I ended up gaining 46 pounds of useful load!
|
|||
|
|
|||